Home → Identify → How to Spot Dyed Quartz and What Home Checks Cannot Tell You
How to Spot Dyed Quartz and What Home Checks Cannot Tell You
Edison Cheng
Diploma in Crystal Identification, Gemmological Institute, China University of Geosciences
Published
English edition of the original Chinese article.
Dyeing is one of the familiar ways to change a crystal's appearance. It is inexpensive and can produce vivid colors, so treated material may be more common than a buyer expects. The useful news is that learning where to look can help you recognize warning signs without damaging a piece.
Four widely repeated suggestions are to check for inclusions, look for bubbles, feel whether the stone is cold, and examine double refraction. Search summaries may repeat these suggestions, too.
Some observations can help investigate what a material is. They do not establish whether its color has been added. A dyed quartz bead is usually still quartz. The question is not simply whether it is “real,” but whether its appearance has been altered.
Start by following the color: natural color relates to crystal growth, while introduced dye often collects in openings within the material.
The main warning signs
- Color is noticeably deeper along fractures or inclusion boundaries, forming a network of concentrated lines.
- Drill holes, worn areas, or chipped edges reveal a different shade or surface appearance.
- Color is unusually intense near the outside and much lighter toward the center.
- An entire batch has nearly identical color and appearance.
These signs call for closer examination. Natural variation and other treatments can complicate the picture.
Do not use a water or solvent soak as a yes-or-no test. A stone that does not release color is not necessarily undyed; one that does release color is not automatically proven to have been dyed.
Material identity and color treatment are different questions
Many online explanations mix up two separate issues.
Material identity: Is the object quartz, chalcedony, glass, or something else?
Treatment: Is its color natural, or has the material been treated to change it?
The familiar “real or fake” shortcuts do not answer the second question. In gemological reporting, dyed natural material is treated material, not automatically an imitation. Its treatment needs to be disclosed rather than hidden behind the word “natural.”
1. Examine fractures and inclusion boundaries
Why this helps
Introduced dye can collect in pores, fractures, and other openings. Concentrated color in these areas is one of the observations used when investigating dye treatment.
What to do
Use good lighting and a 10× loupe. Examine fractures and the boundaries around visible inclusions.
Look for color that is much darker inside a fracture than beside it, especially when it follows a web-like network. In included quartz, such as phantom quartz, compare the color at boundaries with the color in the surrounding material.
What can complicate the result
Natural color zoning can also run in a particular direction. The distinction is between color related to growth structure and concentrated color following fractures.
Yellow-brown to reddish-brown staining in cracks may be natural iron-related material. Do not classify every colored fracture as dyed; experience or further testing may be needed.
2. Inspect drill holes worn areas and chipped edges
Why this helps
Both dyeing and drilling happen after a stone is extracted, and their order can leave visible clues.
When drilling comes first, dye may enter the hole and make its walls darker. When dyeing comes first, drilling may cut through a colored layer and expose a paler area. Either pattern can be worth investigating.
The question is whether the difference between the hole walls and the body color looks consistent with the rest of the piece, not whether a hole is simply dark or light.
What to do
Under good lighting, use a 10× loupe to inspect the inside edges of drill holes, existing wear, and any chips.
Look for a conspicuous change in shade, or an underlying color that does not match the surface.
What can complicate the result
This approach is much less useful on an undrilled object with no visible wear or damage.
The observation is a general gemological clue, not a quartz-only rule. The GIA example cited in the original discussion concerns dyed pearls.
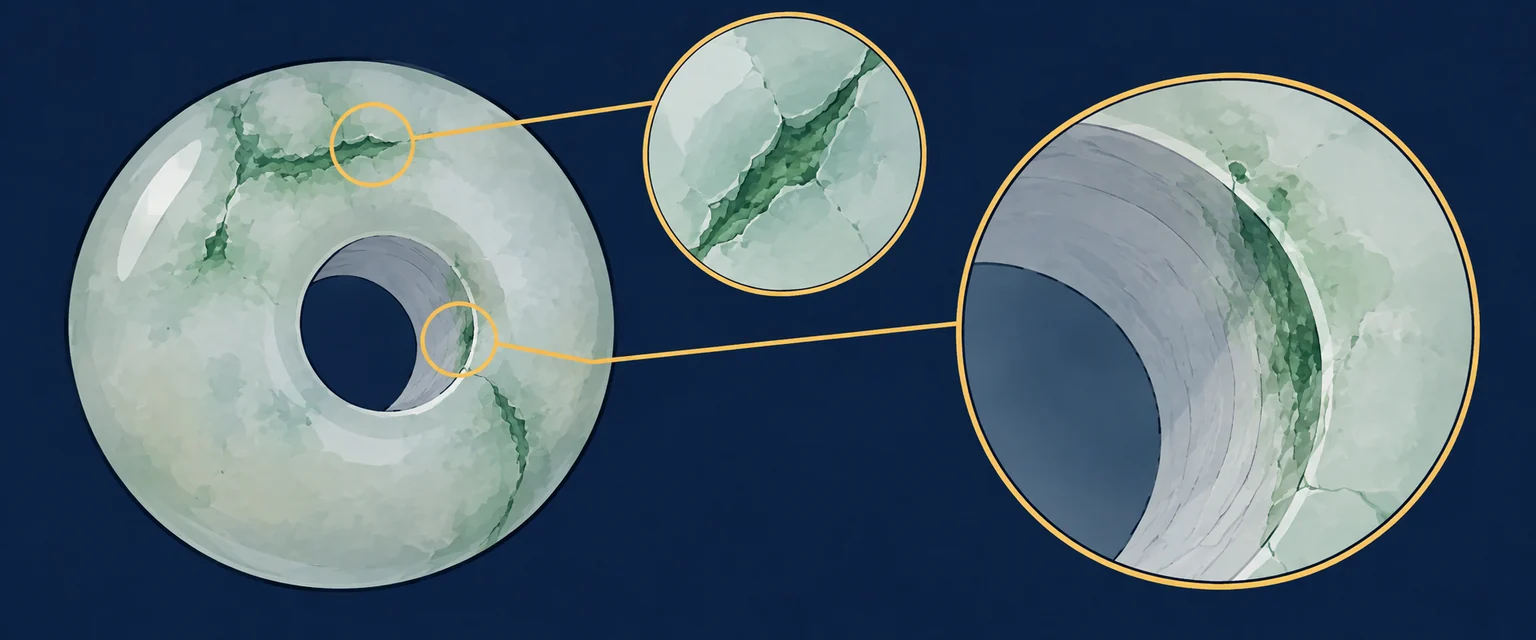
- Colour in fissures
- Look for colour concentrated along fissures.
- Around drill holes
- Drill holes and worn areas deserve closer examination, not an automatic verdict.
3. Compare color near the surface with color deeper inside
Why this helps
Some treatments aim to intensify inclusions or change their appearance, for example by making pale phantom inclusions appear green. Dye may be applied after a piece has already been shaped and polished.
If penetration is limited, color can be stronger near the outside and weaker farther inside. In some pieces, areas close to the surface may look almost black while deeper areas are pale or a different color.
What to do
Compare the appearance of inclusions at different depths. Look for abrupt or unnatural-looking transitions, particularly where an inclusion approaches the surface.
What can complicate the result
Natural inclusions vary considerably, and unusual distributions do occur. This is a clue to combine with other observations, not a guarantee from one viewing angle. Practice and experience help reduce false conclusions.
4. Compare the whole strand or batch
Why this helps
Natural material often varies from piece to piece. A batch with almost identical color, brightness, luster, and appearance deserves a closer look. Treatment or synthetic origin may be among the possibilities.
What to do
Place the entire strand or group together and compare shades, tones, and color intensity. Are the beads nearly indistinguishable from one another?
What can complicate the result
Uniformity alone is not proof of dyeing. Use it as an initial screening observation, then compare it with the fracture, drill-hole, and depth-related clues above.
A quick comparison
| Check | What to examine | What the observation may suggest | Main limitation |
|---|---|---|---|
| Fractures and inclusion boundaries | Color collecting along a network of openings | Possible dye treatment, especially with distinctly concentrated color | Natural iron-related staining can look colored too |
| Drill holes and existing wear | A pronounced difference between exposed areas and the surrounding body | Possible dyeing or coating | Needs a visible opening, wear, or damage |
| Surface versus interior | Strong color near the outside and a much paler interior | Reason to investigate limited penetration | Unusual natural inclusions can complicate interpretation |
| Whole strand or batch | Nearly identical shade and intensity in every piece | Reason to investigate treatment or origin | Uniformity is not a diagnosis |
What to take away
All four checks ask the same question: where is the color, and how did it get there?
Natural color follows features of the crystal's growth. Introduced dye often leaves concentrations in fractures, drill holes, and inclusion boundaries. Looking for those patterns is more useful than asking whether the stone feels cold.
Dyed material is not automatically fake material. Treatment is a separate fact that matters to a purchase. Ask the seller to describe the origin of the color in writing.
For a high-value purchase, or when different observations conflict, seek a qualified gemologist or an independent testing laboratory.
These visual checks are for learning and preliminary screening. They do not constitute a gemological report and cannot replace professional identification.
References
The original article cites the following sources. Examples involving other gem materials illustrate an observation; they are not proof that the same feature conclusively identifies dyeing in every quartz specimen.
- GIA, An Introduction to Gem Treatments. An overview of dyeing, other treatments, disclosure, and care.
- GIA, Quench-Crackled and Dyed Laboratory-Grown Sapphire. A sapphire example involving dye in induced fractures.
- GIA, Dyed Yellow Beaded Freshwater Cultured Pearls Imitating South Sea Cultured Pearls. A pearl example involving color concentrations around drill holes and cavities.
- GIA, Dyed Chalcedony Imitation of Chrysocolla-in-Chalcedony. A chalcedony example comparing the surface and interior.
- CIBJO, The Blue Books, including the Gemstone Book.